Saturday, February 18, 2012

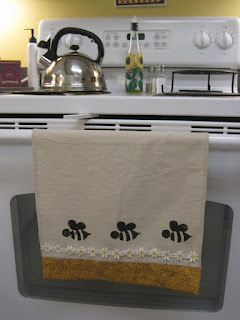
Potato Print Dishcloth


I was caught once again with a slightly barren pantry.  I did manage find this little hermit of a potato hiding behind a box of crackers. 
Clearly, he's been there for a while.  This might be the little brother of my hermit.  Remember him?
My hermit is too old for cooking.  But he will not go to waste.  He will become a printing doohickey.

Materials needed:
1 potato
knife
18" x 22" cotton fabric for main dishcloth
Two 5 1/2" x 18" strips of cotton fabric for edges
18" strip of ribbon or trim
fabric paint
paint brush
cardboard or newspaper

Slice a potato in half.  Make sure it's a clean, straight cut because this will be your printing surface.  Since mine was a bit skinny, I cut it at a slight angle to make the surface area a bit larger.

Carve your design with a knife or a cookie cutter. I used my apple corer to get a nice round bee head.


Lines can be made by making little v-shaped cuts.


Place fabric down on top of cardboard or newspaper to catch any bleed-through from the paint.  

Brush potato with paint and press to cloth.  Press firmly.  Lift straight up.

Brush potato with paint each time to ensure a clear image.  
I really should have ironed the wrinkles out of my fabric first.  

My girls were painting with their watercolors while I was potato printing.  This is what happened when I asked them to wash their hands while I finished with the potato prints.

Allow the paint to dry completely and then heat set the fabric paint with an iron.  

To hem edges, fold side edges over 1/4" twice and stitch.

With right sides together sew one strip of contrast fabric to each end of dishcloth.  Contrast fabric should extend past the hemmed edges by 1/2" on each side.  Press seam allowances toward contrast fabric.

Fold edge of contrast fabric down 1/2" and press.  Then match up folded edge and sewn edge with right sides together .

Sew 1/2" seam along both sides of contrast fabric.

Turn contrast fabric right side out and stitch down open edge.

Add a length of trim, folding over raw edges if necessary.  

Stitch.
Hang in a nice place and wait for spring to arrive.

Oven Roasted Potatoes

My favorite potato is the one on top that is crusted over and then the sweet potatoes that are blackened -- Oh my goodness, you guys they were soooooo good!
Ingredients: 2 medium idaho, 1 large sweet potato
2 tsp. minced garlic (more is more so don't be shy)
1/4 cup olive oil
1/2 cup water
1/2 tbl. dried oregano
2 tbl. lemon juice
plenty of salt and pepper

Directions:
Preheat oven to 420 degrees F.
Put all the ingredients into a baking pan large enough to hold it all.
I used a 9 x 13 glass baking dish and sprayed it with pam.
Season generously with salt and pepper.
Now give everything a toss with your hands to distribute the ingredients.
The garlic will drop into the water/oil but its flavor will permeate the potatoes.
Bake for 40 min.
When a nice golden crust has formed on the potatoes, give them a stir to bring the white underside up, season lightly with a bit more salt and pepper and just a light sprinkling of oregano.
You can add a little more water if you need to, then put it back in the oven for another 40 min.
DON'T BE AFRAID OF OVERCOOKING!!!
They will be delicious!


Berry Almond Potato Bread Braid

Berry Almond Potato Bread Braid
1 recipe potato bread already risen and ready to form
1 container cream cheese
1/2 teaspoon almond extract
3 tablespoon plain yogurt
1/4 cup sugar
1/2 cup cherry preserves(or more if you need)
handful blueberries
beaten egg to brush on the bread
White chocolate to drizzle on the bread

Roll out bread dough on wax paper


Cut dough evenly on both sides leaving a larger tail at both ends.

Make almond cream cheese by beating together cream cheese, almond extract, yogurt and sugar. Spread mixture on the bread. *Note-this is enough mix for 1 large loaf or 2 medium loafs.


Spread on preserves and blueberries.


Fold tails in and braid the bread.


Brush the bread with a beaten egg.


Bake at 350 until done and, if you're like me, drizzle with white chocolate. :)

This is my family's new favorite breakfast...poor cinnamon rolls are starting to feel neglected.

Healthy French Fries!

New Best Friends! And only $3.99 at the local kitchen store!
                                                                                                                                                                  Ms. Potato Head looks a little worried--fear not, dear one, you may supervise this recipe! So that Ms. Potato Head could stand up straight, we just sliced one of the ends off--same for her dicer buddies.                                                            


With a flat surface on the potato...


 It makes it so much easier to dice.


Place diced potatoes directly in water so that they do not discolor.


Wet Ingredients:
Equal amounts of Olive oil & hot sauce

Dry Ingredients:
Brown Rice Flour
Ground Flax Seed
Onion powder
Garlic powder
Cayenne
Cajun spice or chile powder


Put oil and hot sauce into a large bowl.


Whisk it until blended. Set aside.
Combine dry ingredients. This is totally up to your taste on proportions of these spices. The flax seed, in addition to its flavor, helps bind all the ingredients so that they don't fall off the fries. The brown Rice flour, is of course, the main bulk of this dusting. And yes, white flour works, too.
Place this flour mixture into a large ziplock bag.


Now, back to the wet ingredients. After drying them off a bit, thoroughly coat your diced potatoes with the hot sauce/oil mixture.


Then in batches, put diced potatoes into the ziplock bag, and shake...


Coating the potatoes with the flour mixture.

Place on a parchment lined baking pan and set in a preheated 400 degree oven for 45 minutes. I didn't even turn them in the baking, and they cooked evenly. Taste them to make sure the flavor is right. You can add salt if you think it is necessary, but with all the seasoning you have already done, it shouldn't be needed.

Serve it up with Ketchup and dig in! 

Thursday, February 16, 2012

Quarantined!

Last Wednesday my daughter Emma came down with a fever and I got a phone call within that same afternoon that my son Isaac was not allowed in school for another 2 1/2 weeks because he is not vaccinated and there is a break out of Pertussis (whooping cough) in the school. Well, guess who has whooping cough and who does not! Poor Emma and little Noah bear have had fevers for a week!!! Poor mom! :) Now it has turned into this cough that makes her gasp for air when she is done. Noah has been nursing like a new born! I thought I was done, but, all he wants to do is nurse. Which, has turned to be a huge blessing, because mother's milk has so many antibodies to help him overcome the sickness. So, even though he coughs, it is totally manageable. Now, everyone can sleep at night. 
We have been taking garlic like crazy!!!!!!!!!!!! Emma and Noah have been taking the Super Immune Garlic Formula from Dr. Christopher's which is the best formula. It doesn't taste so great, but, it works! It's a mix of vinegar, garlic, honey, and a myriad of herbs. Emma has downed 4 ounces in one week already! along with the Herbal cough formula that is also amazing. It has been a hard week, but, I've learned a lot and am so grateful for knowledge. It is the key to unlocking the door of understanding and ability.
Emma has only had juice and juice popsicles all week and wanted food. When  her fever had ran it's course and was gone, I told her she could eat fruit and vegetables. So, I thought I'd make potatoes (because she loves them) with lots of garlic. Then, while I was looking for recipes, I found a sight I like called healthyveganrecipes.net . She had a movie of making mushroom gravy with garlic mashed potatoes. So, my recipe is based on her recipes. Isaac got interested and decided to help. He listened to her video instructions so well and really helped, plus, I liked his company! So, here it is!

Garlic and Chive Mashed Potatoes with Gravy!
7 - 8 Idaho Potatoes
4-5 large Garlic Cloves minced
1 T. Olive Oil
1T. Sea Salt
1 T. finely chopped Chives
1- 2 C. Water

Wash and eliminate some of the "eyes"(the divets) from the potatoes. I leave on the peels. There is more nutrition in the skins than the rest of the potato. Quarter and chop into dice sized cubes. Place in a 6 quart pot and cover with water. Boil potatoes until soft. Drain the water. In the same pot, add the minced garlic, setting one aside to add later. Add the olive oil and sautee until soft, not browned. Add potatoes and begin to mash. Add water as needed to create a smoother and creamier potato. Add salt, chives and 1 raw minced garlic clove. Enjoy! 


Mushroom Gravy
2 c. thinly chopped Portabello Mushrooms
1T. Olive Oil
2 T. Balsamic Vinegar
1  c. Water or more if needed
2 T. Arrowroot or Cornstarch liquified in 1/4 c. water
1t. salt or to taste
2 T. liquid aminos or 1/4 c. broth
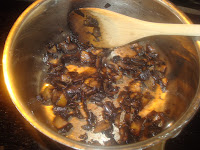
Sautee the mushrooms in olive oil for about 15 - 20 min. on medium heat. Add the vinegar and the salt. Add the water.  Add the arrowroot/cornstarch solution and whisk until thickens considerably. It should be nice and thick, like a pudding. Add the liquid aminos/broth and salt.  Now, if you like, put in a blender with the top insert on the lid removed to let the hot air escape. I usually put a hot pad over the opening to not splash on me, yet let the air escape. (unless you have an amazing Vitamix like mom!). Blend and adjust the flavor if needed. 
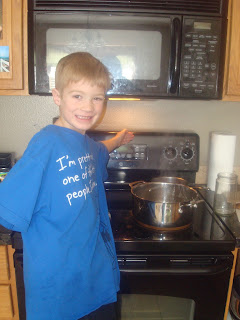
This was our lunch today! Yummy! We had Garlic and Chive Mashed Potatoes with Portabello Mushroom Gravy, Chinese Coleslaw, and Ginger Cashew Peach Smoothie!!

Wednesday, February 15, 2012

Fairies and Hearts

I finally finished the fairies in time to give to the girls for Valentine's Day.  Here they are!


Bean Bag Hearts!

I had some fun with fabric scraps and made Valentine's Day bean bags for the girls to give out to their classmates yesterday.


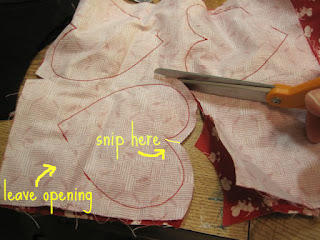
Trace a heart onto scraps of fabric, leaving at least 1/2" between hearts for seam allowances.

Sew on tracing lines, leaving a 1" opening near the bottom of the heart.


Cut 1/4" away from seam lines.  Clip the seam allowance at the top of the heart


Fill with beans


Test out the bean bag on your head.


I used pre-made strips of bias binding to write Happy <heart> day with fabric marker.


Cut into strips, leaving at least 1/2" seam allowance on each end.


Fold over strips, stick ends into opening and sew shut.


I sewed the tags in assembly-line-style and didn't clip the threads in between.  I really like it when they are all connected.
16 hearts!


Happy Valentine's Day!