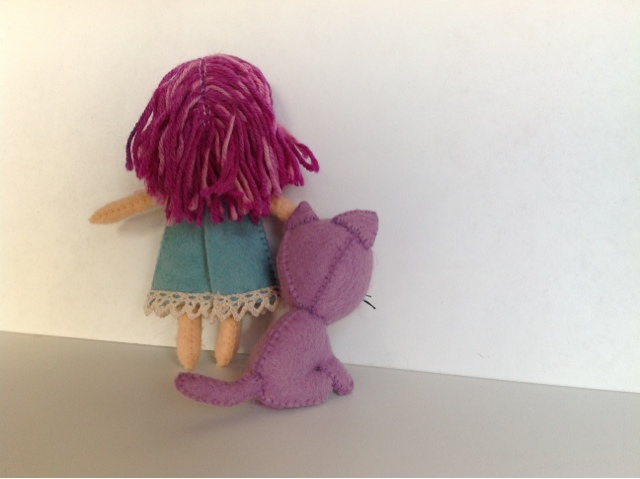
This little dolly and her friend were a birthday present for a friend of Mabel and Stella. I think that I will probably have to make at least two more sets of these in the very near future.
I made them both out of wool felt. Dolly's hair is sock yarn. I discovered that wool felt is much nicer than the cheaper polyester felt from the fabric store. It doesn't shine as much and the stitches are not quite so noticeable as with the poly felt. It is just about a dollar a sheet, but I think it's worth it.
I made the pattern for Dolly and her dress myself. I don't love how long her head is. She's got a Tyra Banks five-head thing going on. Maybe after I make a couple more with smaller noggins I'll post a link to a pattern. The kitty pattern came from a favorite book of mine, Palm-Sized Softies.
Four sisters and our mom. Each month one of us comes up with a topic and we all create something based on that topic. Whether we cook, sew, crochet or design, it's up to us. With five very different personalities and areas of expertise you're bound to see some interesting creations.
Saturday, March 2, 2013
Friday, February 15, 2013
Happy Valentine's Day!
Mabel and Stella passed out these little notebooks for Valentine's Day today. We chose some clip art and then created a layout with four book covers per page. I used my sewing machine to bind the books.
If you'd like to make your own valentine's books, you can download a pdf of the book cover page. (I've left off the names at the bottom for the download.)
1. Print your booklet covers on card stock to make a sturdier cover.
2. Stack up four or five blank pages behind the cover and use a binder clip to hold them together.
3. Use a longer stitch length on your sewing machine and sew down the left side of each picture. There are little grey sewing lines printed on the page for you to follow.
4. Cut along the remaining grey lines to separate each booklet. I used my ruler and rotary cutter and it made the job super easy.
5. Fold each booklet along the stitching line, trim the edges to make them neat and you're done!
We also used Heidi's Clover Crayon idea to melt down some crayons from our vast supply of broken ones and made little heart shaped crayons to go along with each book.
Saturday, January 26, 2013
We're having an art party
I've committed to having eight small kids come to our house and run around with paint, markers and frosting to celebrate Mabel and Stella's fifth birthday. They are very, very into creating art lately.
I made a rainbow of birthday invitations using paint chips from Home Depot. The glue that I was using wasn't doing a very good job of holding things together, so I sewed everything together with my sewing machine. And matching thread, of course.
Friday, December 14, 2012
A Really Good Workout!
This has been one of my favorite workouts from my trainer. It's one that I could remember and substitute one thing for another if I couldn't remember the order. Anyway, it takes about an hour if you go through it twice with 5 minutes of cardio in between the two sets. Also, it calls for things like a kettle ball and some pull up bars, but you can be creative and use what you have around the house. So, it goes like this:
100 jump ropes
90 jumping jacks
80 squats
70 sit ups
60 lunges - 30 each leg
50 kettle ball double arm swing
40 push ups
30 jump back and forth over a bench
20 burpees
10 pull ups (this is not a full pull up...I can't even do ONE of those, this would be like if you're laying on your back pulling your self up to a bar that's about 2 feet above your nose.
Anyway, It's a good hard one, hope you enjoy it! Feel free to call me if you have any questions.
Sunday, November 11, 2012
Happiness
Happiness is . . . . .
a bowl a warm soup in one of your favorite bowls on a cold winter day. (By the way, I got the bowl for .75 at a second hand store and the table runner for .50 at a second hand store. :) Pretty huh!)
Happiness are friends who give you selfless love and encouragement, happiness is calling mom and having a good laugh or a good cry, happiness is being with your children laughing and being silly, happiness is a handful of chocolate chips, happiness is finding a good deal at the store, happiness is receiving an unexpected package or letter in the mail from someone you love, happiness is talking to your brother or sisters, happiness is being able to be where the Lord wants you and watching His hand touch others lives. Happiness is knowing that God is our caring and loving Father who watches over us with tenderness. Happiness is being good, honest, and true.
I have had some really amazing experiences in my life recently that have led me to feel so grateful for God's hand in my life and to realize how much He loves us and all the "little things" we care about. There are so many things that have happened recently, I don't think I could write them all. Suffice it to say, I love Heavenly Father and I know He loves us.
I received a book in the mail as a gift from a really wonderful man. He is always so thoughtful and loving to me. The book is called The Boy Who Changed The World. It's about how our lives influence other lives and make all the difference. There is a scripture that says "Through small and simple things, great things come to pass". All the little things we do count. Just as if we saved a penny every day, we would have $3.65 at the end of the year. Our actions and choices have that same effect. Here is a page from the book I want to share with you.
Thank you to all my family and friends for all the sometimes seemingly small and simple things you do, for they have left a great imprint on my heart. I am grateful for wonderful memories we have of times shared together and of your caring influence now. I love you guys! If you have time this week, post something that makes you feel happy or grateful. It feels good!
a bowl a warm soup in one of your favorite bowls on a cold winter day. (By the way, I got the bowl for .75 at a second hand store and the table runner for .50 at a second hand store. :) Pretty huh!)
Happiness are friends who give you selfless love and encouragement, happiness is calling mom and having a good laugh or a good cry, happiness is being with your children laughing and being silly, happiness is a handful of chocolate chips, happiness is finding a good deal at the store, happiness is receiving an unexpected package or letter in the mail from someone you love, happiness is talking to your brother or sisters, happiness is being able to be where the Lord wants you and watching His hand touch others lives. Happiness is knowing that God is our caring and loving Father who watches over us with tenderness. Happiness is being good, honest, and true.
I have had some really amazing experiences in my life recently that have led me to feel so grateful for God's hand in my life and to realize how much He loves us and all the "little things" we care about. There are so many things that have happened recently, I don't think I could write them all. Suffice it to say, I love Heavenly Father and I know He loves us.
I received a book in the mail as a gift from a really wonderful man. He is always so thoughtful and loving to me. The book is called The Boy Who Changed The World. It's about how our lives influence other lives and make all the difference. There is a scripture that says "Through small and simple things, great things come to pass". All the little things we do count. Just as if we saved a penny every day, we would have $3.65 at the end of the year. Our actions and choices have that same effect. Here is a page from the book I want to share with you.
Thank you to all my family and friends for all the sometimes seemingly small and simple things you do, for they have left a great imprint on my heart. I am grateful for wonderful memories we have of times shared together and of your caring influence now. I love you guys! If you have time this week, post something that makes you feel happy or grateful. It feels good!
Tuesday, September 18, 2012
Croc Make-Over
Crocs are one of the best-ever shoe designs for kids. They are easy to put on and easy to clean. If you're feeling indulgent you can buy those little button do-hickeys to pop into the holes. But those are remarkably expensive for what you get, a little hunk of plastic.
M & S wanted a little bling on their shoes and when they saw these big packs of flower buttons and sparkles on our latest venture to retail-land they knew that they had found what they were looking for.
I armed myself with a hot glue gun and put glue spots onto the shoes as directed by M & S. They dropped the buttons and sparkles onto the glue and I pressed them down. Remarkably, the hot glue does not melt the croc foam and the glue stays stuck. I tested both sets of crocs before we got started. One set of shoes are faux-crocs, the other are the real deal, neither melted.
It was a fun, inexpensive project and now my girls have one-of-a-kind crocs that they are going to proudly wear to school tomorrow.
Sunday, July 22, 2012
Sexy Hexy Lexi Quilt
I made a quilt last week. It was a gift for my niece, Lexi, who graduated from high school last month. This is my fourth denim quilt and I really, really like how it turned out. I finished it at 3 am the day before her party. Why do I do that to myself?
I quilted a flower into the center hexagon. I meant for it to look like two daffodils, which are six petaled flowers. They kind of go with the hexagon theme, and Lexi likes daffodils. In the other printed hexagons I quilted her name, one letter in each hexagon. I printed her name in a pretty, somewhat abstract font and enlarged the letters to about five inches in height. Then I pinned the paper to the quilt and stitched right on the paper, outlining each letter.
I used Amy Butler's Sexy Hexy Love quilt pattern. It was my first quilt with hexagonal piecing. Hexagons are not trivial to put together, nor to cut out. Every piece was individually cut from the jeans that I've been collecting and storing in my basement for the past fifteen or so years.
I quilted a flower into the center hexagon. I meant for it to look like two daffodils, which are six petaled flowers. They kind of go with the hexagon theme, and Lexi likes daffodils. In the other printed hexagons I quilted her name, one letter in each hexagon. I printed her name in a pretty, somewhat abstract font and enlarged the letters to about five inches in height. Then I pinned the paper to the quilt and stitched right on the paper, outlining each letter.
Thursday, July 19, 2012
HAPPY VACATION!
Sunday, July 15, 2012
Good Jam Mom
We had our usual "Breakfast for Dinner" Sunday night and thought some of that apricot jam might be nice. IT WAS!!! John has actually has been eating it all week long - he loves it! Good job Mom!
Tuesday, June 26, 2012
It's an Apricot Fiesta!
So June has been APRICOT month for me. They opened up the church apricot orchard for picking--and I picked!
I haven't even counted up how many pints of jam, fruit leather, and dried apricots I've done, but by the time I got to the last few batches of jam, I had perfected my recipe!
The Jalapeno--Apricots new best friend!
Ingredients:
8 Cups cut up Apricots
1 Lemon, 1 Lime (about 1/4 cup juice)
3 Cups Organic Sugar (evaporated cane juice)
1 Cup Real Maple Syrup
1 Cup Honey
1 Cup Agave
1/2 Can Crushed Pineapple
1/2 JALAPENO--Don't be afraid to use this--it's the secret ingredient!
That's right, you don't see pectin in the recipe. I suppose you could add it, but I like my jam a little fluid, not clumpy. You just add all the ingredients (I cut up the jalapeno and blender it up with the lemon/lime juice, so nobody gets a green chunk--you should see my first batch!) Use a very large pot because when you start to boil, it gets fluffy! Bring to a rolling boil, stirring frequently for 30 minutes.
Before you fill your pints, add a couple of apricot nuts (shelled pits) to your jars. It enhances the flavor and they have a nice almondy kind of zing if you want to munch them later. You only need to process this for 10 minutes, then take from your canner and wait for the pings! Makes about 6 pints (more or less) of Fiesta Jam!
I haven't even counted up how many pints of jam, fruit leather, and dried apricots I've done, but by the time I got to the last few batches of jam, I had perfected my recipe!
The Jalapeno--Apricots new best friend!
Ingredients:
8 Cups cut up Apricots
1 Lemon, 1 Lime (about 1/4 cup juice)
3 Cups Organic Sugar (evaporated cane juice)
1 Cup Real Maple Syrup
1 Cup Honey
1 Cup Agave
1/2 Can Crushed Pineapple
1/2 JALAPENO--Don't be afraid to use this--it's the secret ingredient!
That's right, you don't see pectin in the recipe. I suppose you could add it, but I like my jam a little fluid, not clumpy. You just add all the ingredients (I cut up the jalapeno and blender it up with the lemon/lime juice, so nobody gets a green chunk--you should see my first batch!) Use a very large pot because when you start to boil, it gets fluffy! Bring to a rolling boil, stirring frequently for 30 minutes.
Before you fill your pints, add a couple of apricot nuts (shelled pits) to your jars. It enhances the flavor and they have a nice almondy kind of zing if you want to munch them later. You only need to process this for 10 minutes, then take from your canner and wait for the pings! Makes about 6 pints (more or less) of Fiesta Jam!
Sunday, June 24, 2012
Hay Bale Loading
Just for fun, I wanted to share some pictures of what my kids and I did. This last Saturday my best girlfriend Jenny and her husband invited me and my kids to help them load their hay bales up in Walsburg. That sounded fun and I always jump at the chance to help them. They always do so much for me. They are some of the best people I have ever known. Our kids play together constantly and are their closest friends. This is her husband Matt and son Dain on the trailer.
I had no idea what it would be like. We had a lot of hard work to do, but, it was so fun and soooooo beautiful!
Noah and I took a break for a bit and took pictures and ooooohhhd and aawwwdd at the farm equipment and the amazingness of it all and managed to snap a picture of ourselves!
Emma, Dain, and my dear friend Steve- from Seven Peaks- daughter Bella were trying to lift the bales of hay. Steve and Bella wanted to visit us on Saturday and decided to help us with the hay loading. These bales actually weighed A LOT!
Below here is my girlfriend's other son Bryant and another boy Duncan. They all worked hard and did a great job!
My favorite action picture! These men were so tough! I was totally impressed! I could pick up the bales and put them on the trailer, but over my head????? and throw them???? Wow! Needless to say, I am not feeling so great today. Mostly I have had horrible allergies from all the hay, but, my friends the herbs are keeping me company and helping me feel better. :) It was a great experience. Glad it only happens once a year. I'm plum wore out!
Friday, June 22, 2012
Tuesday, June 19, 2012
Oven Roasted Peanut Butter S'mores
I really love the idea of s'mores. I love roasting the marshmallows over an open fire. Graham crackers are a tasty snack. And, of course, there's chocolate. Lovely, delicious chocolate. Individually these things all make me pretty happy. Somehow, for me, when they're all put together, something is just not right. The cracker too crumbly, the chocolate too hard and the marshmallow way too sticky and sweet. I usually pass when s'mores are on the menu. But not this time. I tried a variation that had me wanting more.
I substituted peanut butter cups for the standard milk chocolate. What a great flavor! The peanut butter tamed the sweetness from the marshmallows. Peanut butter lovers, this is the s'more for you!
We don't have anywhere to roast marshmallows here at the beach house. That took a bit of the fun out of getting the marshmallow toasted. I used the oven instead and it worked like a charm. The best part of using the oven was getting the peanut butter cups warm and melty under the broiler making it blend really well with the marshmallow.
Stack the marshmallow on top of the cracker. Put into the oven to broil on low.
Chocolate takes WAY less time to melt than the marshmallow. Wait until the last few seconds to put the chocolate under the broiler. In fact, this whole melting process takes only a minute or two. Leave the oven light on and don't walk away from it!
Hot and puffy! Although they could stand to be a little more toasted.
I substituted peanut butter cups for the standard milk chocolate. What a great flavor! The peanut butter tamed the sweetness from the marshmallows. Peanut butter lovers, this is the s'more for you!
We don't have anywhere to roast marshmallows here at the beach house. That took a bit of the fun out of getting the marshmallow toasted. I used the oven instead and it worked like a charm. The best part of using the oven was getting the peanut butter cups warm and melty under the broiler making it blend really well with the marshmallow.
Stack the marshmallow on top of the cracker. Put into the oven to broil on low.
Chocolate takes WAY less time to melt than the marshmallow. Wait until the last few seconds to put the chocolate under the broiler. In fact, this whole melting process takes only a minute or two. Leave the oven light on and don't walk away from it!
Hot and puffy! Although they could stand to be a little more toasted.
![]() |
| Squish. |
![]() |
| Mmmmm.... |
![]() |
| mmmmmmm.... |
![]() |
| good! |
Monday, June 18, 2012
The Original Marshmallow and Almost Raw Smores Squares
My almost vegan brain was a little discouraged at the smores topic this week at first and then it got me thinking . . .
I try to stay away from white sugar and gelatin, yet, my childhood memories are quite happy eating that gooey yet toasty mess fresh from the fire. It got me wondering about marshmallows. I use an herb often for allergies or congestion called Marshmallow, Althea officinales. Click for a picture of the Marshmallow plant. I wondered if it had anything to do with the Stay Puff treat we use these days. Well, sure enough. It originated from it! Here is a great link to read a bit about it. Marshmallow's Origin I have seen so much success with marshmallow. I actually used it when our family had whooping cough. I made a concoction of marshmallow, thyme, and honey. That really helped a lot! I could tell a direct correlation to my wellness with that mixture.
As I read, I thought, if they can then maybe I can too!
1 oz. marshmallow root
2 c. pure water- distilled or reverse osmosis is best
about 1/4 c. raw honey
optional- 1/8 t. xanthum gum This helps to suspend the honey better and not seperate from the marshmallow cream.
Wash the roots if freshly picked. Peel off the skin as best as possible. Chop finely. Bring the water to a boil and add the roots. Turn the heat down to keep a moderate boil. Boil for about 45 minutes until they soften completely. Take off the heat and allow to cool. Once cooled, strain through a cloth. The liquid will be slimy because of its mucilage nature. Keep the liquid seperate from the roots. Take the liquid and place into a bowl with the honey. Beat the mixture for about 20 minutes, or until you get a white, heavy foam. Place a piece of plastic wrap down in a bread pan. Oil the plastic and then pour in the mixture. Freeze for about 1 hour and WAL-L-A!
(Optional- Place the roots back in the pot and cover with maple syrup evenly. Put on medium heat for about 5 minutes. This mixture can be used as a candy treat or added to my crust for the smores squares I made.)
My next treat to make was the chocolate. I got this idea from making coconut butter off a lovely website called
To make your own coconut butter, simply add as much coconut flakes as you like. I did about 4 c. and then process it in a food processor or a high powered blender for about 20 minutes give or take a few. Coconut butter has the fiber with the oil, thus making it better in your digestive tract. It is thicker and makes a lovely butter. Just add a little salt to taste.
To make your own chocolate bars or chips with coconut butter . . .
1/4 c. coconut butter
1/4 c. coconut oil or omit and use all coconut butter
1/4 c. agave
1/4 c. maple syrup
dash of salt
1 t. vanilla
Blend in a food processor or blender. Line an 8x8 pan with plastic wrap and pour into the pan. Freeze for atleast 1 hour and then cut into small cubes. This chocolate will be firm, but not completely solid.
1 c. walnuts soaked for atleast 1 hour
1/4 c. sweetened and softened marshmallow root (made earlier in this blog, see above)
4 pitted dates
dash of salt
Place in a food processor and process until it forms a somewhat sticky dough. Place plastic wrap on the bottom of a bread pan and then press into pan. I use a piece of plastic to press it down and not get my hands sticky.
Kelly's Smores Squares
My kids really liked it! But, I think I will omit the marshmallow root from the crust next time. Parts of it didn't soften and left woodsy pieces in it here and there. But, my kids were good sports and spit them out like you would a watermelon seed. :)
Thank you Mom for such a great tutorial in the last post you did on the "cowboy" beans! I love the flavor and texture of the beans. They were perfect. Come have lunch with us!
I have yet to figure out the picture format on this darn blog site!!!!! Sorry for the weird format.
Subscribe to:
Posts (Atom)