Tuesday, January 7, 2014

School Flag

Update:  done!  


I was commissioned by the school where we live and work to made a flag that will hang in the dining hall next to the United States and Connecticut flags.  It's a simple design which is very similar to a flag seen in a photograph of the school from the early 1900's.  We updated the font from the original block lettering to the current official font of the school.  I'd post the historical photo, but I don't think I have permission for that.  
The flag will be hung tomorrow morning.  I'm not done with it yet.  But it just wouldn't be right if I didn't stay up till 3 am to get a project done, don't you agree?
Here's what I've got so far.  I'll post more pictures of it when the flags are hung tomorrow.

The dimensions of the flag will be approximately 4x6 feet.  I printed the lettering out on a big roll of paper for the layout.  The letters were cut from nylon, interfacing and fusible webbing all layered together.  

I had to stitch the letters onto the printed layout to get the spacing correct.  Afterwards I flipped it over and ironed the letters down through the paper.

What a relief to see that the letters stayed where I wanted them to!  Now I just have to satin stitch around the letters, add two grommets to the top and bring it to the dining hall in the morning.

The Little Mermaids

I fell in love with this little pattern from a book that I borrowed from a friend.  Its called Wee Wonderfuls by Hillary Lang.  I love how the mermaids can change into a human by simply slipping off their tails.   They have super soft minkee hair, flannel "swimsuits" and a cotton head.  Their tails are made from from my quilting fabric stash.  

Monday, December 30, 2013

Water Bottle Carriers

I made my first water bottle carrier for Kelly--we drove up to Cascade Springs that afternoon during one of my weekend visits.
This is a detail of the knit pattern. Many of you got them for Christmas--hope you enjoy them!
They're made of 100% wool, so they are felted down to shrink over a quart size mason jar.
These are the ones I made my younger grandkids, they are for a regular water bottle--and yes, they are drying on my shower curtain pole after a nice hot shrinking in the washer!

Friday, December 6, 2013

Make Something

The sky is the limit for this one.  Anything goes. 

Dishcloths!

A friend and I decided to join forces and try selling these pretty dishcloths at some holiday craft fairs this year.  She bought the lovely fabric and I cut and sewed a nice edge around them then tied them together in either sets of two or as singles.  She will take them to the craft fairs and sell them.  Then we split the profit.  I just finished edging 59 for the craft fair this weekend.  I wonder how it will go.

Tuesday, December 3, 2013

Secret Santa


I joined in with a group of gals here at the school in a Secret Santa swap.  I love getting and giving random gifts!

My Secret Santa has been busy in her workshop making this amazing advent banner.  Each and every one of the 25 stars has an adorably hand stitched pocket on its tummy.  I love it!  Squeeeee!!!  And the set came complete with 25 delicious chocolates to tuck into the pockets.  But who can only have one chocolate per day?  Certainly not me.  


I made a couple of ribbon and bead ornaments for my secret person.  I used 3/4" grosgrain ribbon, glass beads and buttons.  I really like how they turned out!  Maybe I'll make a set for my tree...  But if I did I would probably end up giving them away to someone else. 

Sunday, July 28, 2013

Gingham Checked Rag Doll

When I was 16 years old (an eternity ago!) I made my little niece Traci a pink gingham checked doll for her first birthday. We shared a lot of fun times together when she was a little girl. I loved her so much! Recently, Traci passed away, leaving grown-up children of her own. As I pondered over what I could do in remembrance of my sweet niece, the visual image of this doll came back to me and I knew I needed to make her daughter something I had made for her mom many years earlier. So, Traci, I love you, and  here for your daughter is that silly little pink checked rag doll.  


Baby Sea Animal Quilt

I started this quilt three years ago, and finally got all the pieces sewn together. I still have to put on the boarder and then of course the batting and backing. But the big work is done. I used a pattern (McCall's 6096) for the top three animals--ugh! That's why it took 3 years! What a lot of little pattern pieces, many duplicates of the same animal. My favorite animals are the two that I created myself, the sea turtle and the sea horse.

I hand appliqued the stars and animals using the freezer paper technique, and embroidered a few mouths.


I couldn't figure out where to put a mouth on the sea horse, so she will just have to be the silent type.
So the crab is pleasant enough...


The blow fish is kind of a dork...


And the octopus? Well, maybe we should call him a pentopus--get it, 5 legs, instead of 8. OK, so I'm an art teacher--the other 3 legs are really there, we just can't see them!

XeTava Lemonade

So for my birthday, Lisa & Bill took me and the girls to this wonderful local restaurant called XeTava--it was HOT outside, the desert tends to be that way in July. We ordered a lovely refreshing lemonade. While the rest of the lunch was scrumptious, it was the lemonade that was the real hit. I just had to try and duplicate it, so here goes.....

1 Cup fresh lemon juice--about 6 lemons
3/4 Cup Agave
1/8 Cup fresh mint leaves
2 Cups water

Blend this all up in your Vita Mix, you can stop before all the pieces of mint are liquified, or like I did, just blend it till it's a nice smooth light green. You're not done!

Now you are going to add the following:

1/2 teaspoon powdered vanilla
1/4 Cup canned coconut milk
1/8 teaspoon Xanthan Gum (this is totally optional, it just holds things in suspension-a health food item)
7 Cups of Ice

Now blend this all up till it begs to be poured into a nice tall glass. Top with a sprig of fresh mint, a mini umbrella, and get ready for one of the most refreshing drinks EVER!

Saturday, July 20, 2013

Teapot froo froo

We gave a teapot to our friends as a little thank you gift for letting us park our camper at their house for a week.  I wanted to dress it up a little before presenting it.  I made a little felt flower with wool felt, glass beads and a big safety eye for the middle to hold everything together.  I attached it with a little crocheted tie with beads on the ends.  

If you look at the reflection in the teapot you can get a little glimpse into what we've been calling home for the past month and a half.  

Monday, April 22, 2013

Baby Hsia Sweater


I started knitting this while nursing my twin baby girls five years ago. With my babies propped up on a boppy pillow on my lap, I realized that I could easily knit while they nursed. It was quite a sight.  I was a pretty slow knitter at that point in my life. I only got halfway done with this sweater before they started getting old enough to start pulling at the yarn. So it went into the unfinished project bin for many years. I dug it out and decided to finish the sweater for my good friend who is due with baby number two any day now.
The pattern is Bamboo Baby by Tamara Del Sonno from One Skein Wonders.  I used a soft and squishy cotton blend yarn called Idena Sorbetto with size 7 needles.  http://www.ravelry.com/projects/maebella/bamboo-baby

Friday, April 19, 2013

Pitter-Patter

I'm going to my friend's baby shower in a few hours. She's having a little girl. I made these out of Rene's gingerbread cookie recipe. I just don't get enough of those cookies if I only make them at Christmas time!
I used a royal frosting recipe for the frosting, which tasted terrible.  It looks cute, is easy to use, and dries to a nice hard finish, but has no redeeming qualities once it goes into your mouth. Use the cream cheese frosting instead if flavor is important.


Grandma Rene's Gingerbread Cookies
(the traditional recipe)

2 cups sugar (part brown, part white)
1 1/2 cups butter or margarine
3 - 4 eggs
1 cup honey and molasses (mostly honey)
1 tablespoon ground ginger (heaping)
1/2 teaspoon cinnamon oil
1 cup milk
2 tablespoons baking powder
2 teaspoons salt
8 - 9 cups flour

Combine all ingredients, chill at least 1 hour.  Roll out 1/4 inch thick and cut with cookie cutter or jar.  Bake at 350 degrees for 9 min or until edges are barely browned.  Frost with cream cheese frosting.


Cream Cheese Frosting
8 oz. cream cheese
1/2 cup butter
1 teaspoon vanilla
2 - 3 drops of cinnamon oil
2 - 3 cups powdered sugar (maybe more...i'm not too
certain about exactly how much to use)

Mix cream cheese and butter until creamy, add vanilla and oil.  Add powdered sugar and blend, adding more powdered sugar if too runny or a tiny amounts of milk if too thick.


Saturday, March 2, 2013

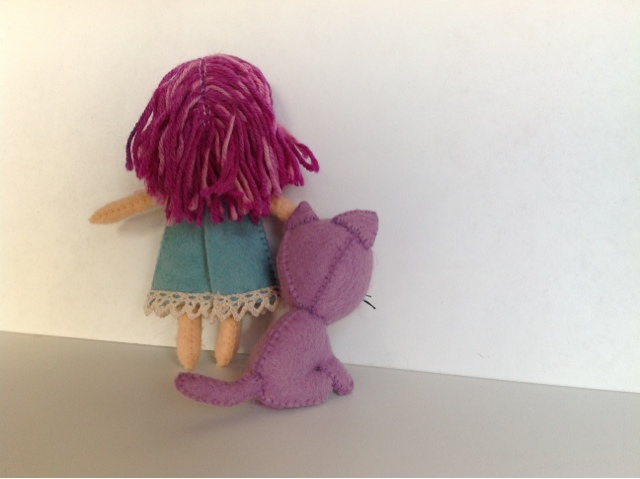
Little Dolly and Her Cuddly Kitty

This little dolly and her friend were a birthday present for a friend of Mabel and Stella. I think that I will probably have to make at least two more sets of these in the very near future.


I made them both out of wool felt. Dolly's hair is sock yarn. I discovered that wool felt is much nicer than the cheaper polyester felt from the fabric store. It doesn't shine as much and the stitches are not quite so noticeable as with the poly felt. It is just about a dollar a sheet, but I think it's worth it.

I made the pattern for Dolly and her dress myself. I don't love how long her head is. She's got a Tyra Banks five-head thing going on. Maybe after I make a couple more with smaller noggins I'll post a link to a pattern. The kitty pattern came from a favorite book of mine, Palm-Sized Softies.


Friday, February 15, 2013

Happy Valentine's Day!


Mabel and Stella passed out these little notebooks for Valentine's Day today.  We chose some clip art and then created a layout with four book covers per page.  I used my sewing machine to bind the books.

If you'd like to make your own valentine's books, you can download a pdf of the book cover page.  (I've left off the names at the bottom for the download.)


1.  Print your booklet covers on card stock to make a sturdier cover.  

2.  Stack up four or five blank pages behind the cover and use a binder clip to hold them together.

3.  Use a longer stitch length on your sewing machine and sew down the left side of each picture.  There are little grey sewing lines printed on the page for you to follow.


4.  Cut along the remaining grey lines to separate each booklet.  I used my ruler and rotary cutter and it made the job super easy.  

5.  Fold each booklet along the stitching line, trim the edges to make them neat and you're done!


We also used Heidi's Clover Crayon idea to melt down some crayons from our vast supply of broken ones and made little heart shaped crayons to go along with each book.  

Saturday, January 26, 2013

We're having an art party

I've committed to having eight small kids come to our house and run around with paint, markers and frosting to celebrate Mabel and Stella's fifth birthday. They are very, very into creating art lately.

I made a rainbow of birthday invitations using paint chips from Home Depot.  The glue that I was using wasn't doing a very good job of holding things together, so I sewed everything together with my sewing machine.  And matching thread, of course.


Friday, December 14, 2012

A Really Good Workout!
This has been one of my favorite workouts from my trainer.  It's one that I could remember and substitute one thing for another if I couldn't remember the order.  Anyway, it takes about an hour if you go through it twice with 5 minutes of cardio in between the two sets.  Also, it calls for things like a kettle ball and some pull up bars, but you can be creative and use what you have around the house.  So, it goes like this:

100 jump ropes
90 jumping jacks
80 squats
70 sit ups
60 lunges - 30 each leg
50 kettle ball double arm swing
40 push ups
30 jump back and forth over a bench
20 burpees
10 pull ups (this is not a full pull up...I can't even do ONE of those, this would be like if you're laying on your back pulling your self up to a bar that's about 2 feet above your nose.

Anyway, It's a good hard one, hope you enjoy it! Feel free to call me if you have any questions.


Sunday, November 11, 2012

Happiness

Happiness is . . . . .

a bowl a warm soup in one of your favorite bowls on a cold winter day. (By the way, I got the bowl for .75  at a second hand store and the table runner for .50 at a second hand store. :) Pretty huh!)

Happiness are family outings, children laughing, a new haircut, and a beautiful bedroom!
Happiness are friends who give you selfless love and encouragement, happiness is calling mom and having a good laugh or a good cry, happiness is being with your children laughing and being silly, happiness is a handful of chocolate chips, happiness is finding a good deal at the store, happiness is receiving an unexpected package or letter in the mail from someone you love, happiness is talking to your brother or sisters, happiness is being able to be where the Lord wants you and watching His hand touch others lives. Happiness is knowing that God is our caring and loving Father who watches over us with tenderness. Happiness is being good, honest, and true.

I have had some really amazing experiences in my life recently that have led me to feel so grateful for God's hand in my life and to realize how much He loves us and all the "little things" we care about. There are so many things that have happened recently, I don't think I could write them all. Suffice it to say, I love Heavenly Father and I know He loves us.

I received a book in the mail as a gift from a really wonderful man. He is always so thoughtful and loving to me. The book is called The Boy Who Changed The World. It's about how our lives influence other lives and make all the difference. There is a scripture that says "Through small and simple things, great things come to pass". All the little things we do count. Just as if we saved a penny every day, we would have $3.65 at the end of the year. Our actions and choices have that same effect.  Here is a page from the book I want to share with you.

Thank you to all my family and friends for all the sometimes seemingly small and simple things you do, for they have left a great imprint on my heart. I am grateful for wonderful memories we have of times shared together and of your caring influence now. I love you guys! If you have time this week, post something that makes you feel happy or grateful. It feels good!

Tuesday, September 18, 2012

Croc Make-Over


Crocs are one of the best-ever shoe designs for kids.  They are easy to put on and easy to clean.  If you're feeling indulgent you can buy those little button do-hickeys to pop into the holes.  But those are remarkably expensive for what you get, a little hunk of plastic.

M & S wanted a little bling on their shoes and when they saw these big packs of flower buttons and sparkles on our latest venture to retail-land they knew that they had found what they were looking for.

I armed myself with a hot glue gun and put glue spots onto the shoes as directed by M & S.  They dropped the buttons and sparkles onto the glue and I pressed them down.  Remarkably, the hot glue does not melt the croc foam and the glue stays stuck.  I tested both sets of crocs before we got started.  One set of shoes are faux-crocs, the other are the real deal, neither melted.  

It was a fun, inexpensive project and now my girls have one-of-a-kind crocs that they are going to proudly wear to school tomorrow.  


Sunday, July 22, 2012

Sexy Hexy Lexi Quilt

I made a quilt last week.  It was a gift for my niece, Lexi, who graduated from high school last month.  This is my fourth denim quilt and I really, really like how it turned out.  I finished it at 3 am the day before her party.  Why do I do that to myself?


I used Amy Butler's Sexy Hexy Love quilt pattern.  It was my first quilt with hexagonal piecing.  Hexagons are not trivial to put together, nor to cut out.  Every piece was individually cut from the jeans that I've been collecting and storing in my basement for the past fifteen or so years.  


I quilted a flower into the center hexagon.   I meant for it to look like two daffodils, which are six petaled flowers.  They kind of go with the hexagon theme, and Lexi likes daffodils.  In the other printed hexagons I quilted her name, one letter in each hexagon.  I printed her name in a pretty, somewhat abstract font and enlarged the letters to about five inches in height.  Then I pinned the paper to the quilt and stitched right on the paper, outlining each letter.

Thursday, July 19, 2012

HAPPY VACATION!

Image:FreeDigitalPhotos.net
Everyone's busy having fun! No worries on major blogspots--just share a favorite photo, recipe or joke this week! I've loved being with you all and look forward to seeing the rest of you soon!