Saturday, January 14, 2012

Wala! Onion Rings!


Wala! Onion Rings! One of our favorite ways to eat onions! This was my first time making onion rings, and they turned out AWSOME!!!

I found this recipe online, it had great reviews, and I had all of the ingredients in my pantry.


Ingredients

  • 1 large onion, cut into 1/4-inch slices
  • 1 1/4 cups all-purpose flour
  • 1 teaspoon baking powder
  • 1 teaspoon salt
  • 1 egg
  • 1 cup milk, or as needed
  • 3/4 cup dry bread crumbs
  • seasoned salt to taste
  • 1 quart oil for frying, or as needed


Directions

  1. Heat the oil in a deep-fryer to 365 degrees F (185 degrees C).
  2. Separate the onion slices into rings, and set aside. In a small bowl, stir together the flour, baking powder and salt.
  3. Dip the onion slices into the flour mixture until they are all coated; set aside. Whisk the egg and milk into the flour mixture using a fork. Dip the floured rings into the batter to coat, then place on a wire rack to drain until the batter stops dripping. The wire rack may be placed over a sheet of aluminum foil for easier clean up. Spread the bread crumbs out on a plate or shallow dish. Place rings one at a time into the crumbs, and scoop the crumbs up over the ring to coat. Give it a hard tap as you remove it from the crumbs. The coating should cling very well. Repeat with remaining rings.
  4. Deep fry the rings a few at a time for 2 to 3 minutes, or until golden brown. Remove to paper towels to drain. Season with seasoning salt, and serve.


I don't think I would've bothered to make homemade onion rings if I hadn't felt the pressure to post something this week, but I'm sooooo glad I did. We had so much fun making AND eating our onion rings!


French Onion Soup, posted too late!


See mom's recipe she posted for ingredients
I guess it's only fair, since mom posted first, that she get to use the recipe. This French Onion Soup has become a staple meal for me during winter. It is light, brothy, yet warms the belly and fills it full of health and yumminess.  I have been sick this week and for lunch and dinner this is all I had and it was just perfect! The recipe calls for 1T. of balsamic vinegar, and it's amazing how it enhances the flavor, giving it a warm, full bodied, cheese flavor. 
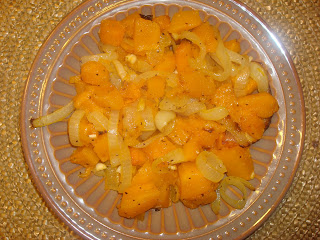
So, a few weeks ago I was invited to visit back in Tennesse and Ohio to be with the man that I love. We ate at the deli at whole foods and had amazing vegan pizza and squash with onions. Man, it was good! and my little Noah chowed on it! So, here it is!

Banana Squash, Onions, and Garlic
1/4 medium sized banana squash seeds removed, skinned and cut into bite size squares
1 Large Onion sliced into rings, or to your liking
1 clove of garlic minced
2 T. olive oil
salt and pepper to taste
Stir squash squares and onions into a glass pan along with the olive oil. Preheat oven to 450, then place in oven for 20 minutes approximately. Check with a fork for the tenderness of the squash. Once tender, turn off heat and turn on the broiler for about 5- 10 min. Enough to get some crisp on the vegetables. Watch it closely! Remove from heat and add the garlic, salt, and pepper.  Enjoy!

Old Fashioned Cough Syrup
 This onion cough syrup is prepared by chopping several large onions into a double boiler.   Cover the onions with honey.  Boil the water beneath the double boiler.  Once the honey has begun to liquefy add an ounce of horehound herb, liquorice root or cherry bark or any combination of these herbs.  These herbs will magnify the expectorant properties of the cough syrup.  Cover and let this concoction simmer in the double boiler for 4 to 5 hours.  Strain the liquid syrup from the herb; bottle, label and refrigerate.  The cough syrup will last several weeks in the refrigerator.

Onion Poultice for Pulling Congestion from the Lungs
The use of onions that have been sliced and lightly sautéed in olive oil until just translucent and laid on the chest, covered with a plastic wrapped with a bandage or covered with a towel and kept warm with a hot water bottle will allow the expectoration action to relieve congestion of the lungs and bronchial tract. I've done this on my children and it has been very helpful, especially in the middle of the night when you want so badly to help them rest and heal. 
found in Herbal Home Health Care by John Christopher or www.herballegacy.com


Thursday, January 12, 2012

Green Onion Risotto

Have you ever watched Hell's Kitchen? I have and I love it! Well on the show they are always making Risotto. Even having an Italian Grandma, I've never had Risotto. So I decided to put that to an end tonight and boy am I glad I did! I had no idea how amazingly good Risotto is. I took a basic recipe and added several things to it and made it my own. If your looking for a creamy yummy comfort food this recipe is for you.

Green Onion Risotto
6-8 cups chicken broth
3 tablespoons butter
2 bunches green onions (chopped and separated)
1 red bell pepper (chopped)
Handful of mushrooms (chopped)
4 cloves of garlic (finely chopped)
2 cups arborio rice
1 cup white cooking wine
1/2 cup freshly grated Parmesan cheese
3 tablespoons mascarpone cheese

1-Melt butter in large saucepan over medium heat. Add white parts of green onions, red bell pepper and mushrooms. Cook until soft about 6 min.


2-Add rice and saute so butter cooks into rice about 3 min.


3-Add wine and garlic and cook stirring frequently until most of liquid is absorbed.

4- Add 6-8 cups of chicken broth 1 cup at a time, cooking until almost all broth is absorbed before adding more, stirring frequently, until rice is tender but still firm, about 20 min.


5-Stir in green parts of sliced green onions, Parmesan, mascarpone. Add more broth by 1/4 cupfuls as needed if dry. Season with salt and pepper to taste.


6-Plate your risotto and sprinkle remaining green onions on top. Enjoy.

Is this cheating?


These baked potatoes really tasted good with a few shakes of dried onion powder.  But does that count?  It feels like I'm cheating.  The onion powder was really an afterthought.  I was going to slice up my only onion and wrap that up with the potatoes, but the thought of chopping onions makes me cry.

Tuesday, January 10, 2012

French Onion Soup--with a Vegan Twist


I just love this, and you really can't mess it up--it is so easy! And I love that usually most of the ingredients are already in your cupboard. 

 Ingredients:
2 Large Onions
2 Tablespoons Olive Oil
4 Cups Water
1/4 Cup Bragg's Liquid Aminos
     (or Soy Sauce)
1 or 2 Bay Leaves
2 Cloves of garlic (if you want)
1/4 teaspoon Thyme
Balsamic Vinegar
(I also added French Bread & Vegan Cheese to top it off)


I chopped the onions, but next time I think I will use my food processor to get those pretty long thin slices like at a restaurant.


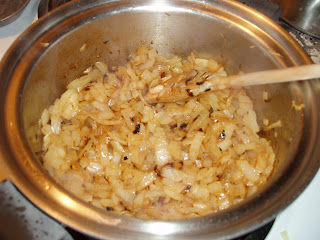
In a medium size saucepan, add olive oil and onions. I used medium high heat to brown or carmelize the onions. It takes at least a half hour, but if you want to help the process along a bit, add a pinch of sugar or sucanat after about 10 minutes into the process.  


I probably should have cooked them a little longer, but I was getting impatient.
At this point, if you want to add a clove of garlic, saute it for only about a minute with the onions. Remember, a clove is only one of the little compartments, not the whole bulb!


 Next, add water (I use distilled--just don't much trust what comes out of the faucet), Liquid Aminos or soy sauce, bay leaves & thyme.


Simmer on low heat for about 30 minutes. I put the lid on and stirred it occasionally. After simmering, remove the bay leaves--if you leave them in it makes a bitter taste. Basically, your soup is done. All you have left is presentation.


Eating it plain is wonderful--I like to spray Balsamic vinegar in it just before serving with a little pepper. (It's always best to wait to add pepper to your cooked dishes until you serve, that way it is easier to digest and better for you.)


However, if you want to impress, toast some French Bread, lay it on the surface and top it off with your favorite cheese (I used vegan, but whatever!). Put it in the oven on low broil until the cheese melts--Yum!